Developers still favor AWS EKS over other container services, according to an AWS survey, but unfortunately over 20 percent of respondents are assigning IAM roles to nodes rather than at the Pod level. This violates the principle of least privilege, meaning each component should only have the access needed to fulfill its purpose.
All individual Kubernetes Pods in AWS EKS by default initially receive the same permission set assigned by the IAM role associated with the worker node instance that they run on. However, this approach exposes a substantial vulnerability for potential attackers.
Inside the AWS EKS cluster, you can have multiple Pods running on a worker node at a given point in time. For example, on the same worker node, the Kubernetes scheduler might schedule a Pod 1, which needs data from DynamoDB tables, and a Pod 2, which requires data from S3. The worker node needs access to both AWS services for the applications to work correctly.
This situation gets even more complicated in a multi-tenant cluster, with a hundred Pods requesting access to different AWS resources. You could grant the worker node access to all AWS resources, but if one of the Pods is compromised, an attacker could access your entire AWS infrastructure.
There are several tools that can solve this problem:
kube2iam: This provides IAM credentials to containers running inside a Kubernetes cluster based on annotations.
kiam: kiam runs as an agent on each node in your Kubernetes cluster and allows cluster users to associate IAM roles to Pods.
IAM Roles for Service Accounts (IRSA): This AWS native solution allows you to associate an IAM role with a Kubernetes service account, which provides AWS permissions to the containers in any Pod that uses it.
This article will focus on kube2iam, covering general architecture to start out. Later, you can learn how to install it first using Helm on AWS EKS, then manually.
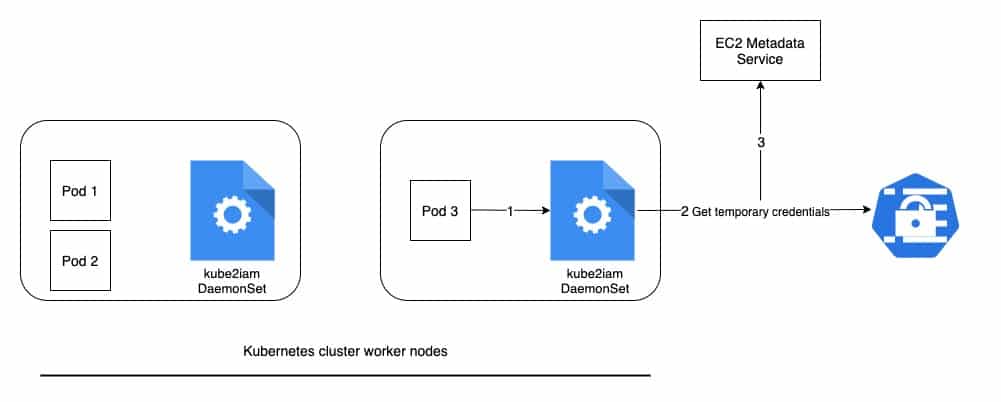
Kube2iam runs as a DaemonSet inside your Kubernetes cluster, meaning a Pod of kube2iam is scheduled to run on every worker node of your cluster. Whenever a Pod tries to perform an AWS API call in order to access resources, that call will be blocked by the kube2iam daemon process running on that node.
It’s kube2iam’s responsibility to make sure that the Pod is assigned proper credentials to access the resource. The kube2iam daemon and iptables rule must run before all other Pods that would require access to AWS resources. This ensures that other Pods that started before kube2iam, using the --iptables=true flag, could allow those Pods to access the real EC2 metadata API, assume the role of the EC2 instance, and gain all permissions of the instance role.
The following diagram illustrates the general architecture of kube2iam:
This is theworkflow of kube2iam on EKS:
The kube2iam DaemonSet running on each worker node intercepts the traffic going to EC2 metadata API.
It connects to the AWS STS API to retrieve temporary credentials and provides them to the caller.
It proxies the call to EC2 metadata API.
Using kube2iam on AWS EKS
There are a few different ways to install kube2iam on your Kubernetes cluster. Our first method is to use Helm.
Prerequisites for that include:
An AWS account
An AWS EKS cluster
The AWS CLI
Installation of kubectl
Helm
Installation of eksctl or kOps for creating EKS cluster
Before you begin setting up kube2iam, you need to create roles for your node to assume. To do that, each node in your cluster must have an IAM policy attached.
Next, create roles for the Pods to assume. Each role will require a policy with only the permissions that Pod requires to perform its duty (i.e., access to S3). You also need to add permission to your Kubernetes nodes to assume these roles.
Make sure that the EKS cluster is up and running. With eksctl (the official CLI for Amazon EKS), you can use the command eksctl get cluster to verify the status of your cluster. For the EKS cluster, use eni+ as the interface name. You can learn about other interfaces based on your CNI provider here.
Use the command aws iam list-instance-profiles | jq -r '.InstanceProfiles[].Roles[].Arn' to get an Amazon Resource Name (ARN) from instance profiles. You’ll use this value later for base-role-arn in the values.yaml for kube2iam Helm charts.
Next, begin the installation using Helm, a package manager for Kubernetes applications.
First add the Helm stable repository using the command helm repo add stable https://charts.helm.sh/stable. Otherwise, the helm install command will fail.
Install kube2iam using the helm install kube2iam stable/kube2iam --namespace kube-system -f values.yaml command on the Kubernetes cluster.
The values.yaml file contains the following:
Verify the installation with the command kubectl --namespace=kube-system get pods -l "app.kubernetes.io/name=kube2iam,app.kubernetes.io/instance=kube2iam".
You might see the following output after running the command. You have a two-node cluster, and both kube2iam Pods should be visible.
1
2
3
NAME             READY   STATUS    RESTARTS   AGE
kube2iam-kfwtt   1/1     Running   0          5m31s
kube2iam-x7n4m   1/1     Running   0          5m31s
AWS Console should show something similar. As illustrated in the following image, kube2iam is installed, and its type is DaemonSet.
Finally, add an iam.amazonaws.com/role annotation to the Pod with the role you want it to assume and apply changes. Following deployment, this example shows how you can pass the annotation in the Pod template of the resource spec.
To verify that kube2iam is working as expected, use kubectl exec to access one of your Pods and run the curl https://169.254.169.254/latest/meta-data/iam/security-credentials/ command. The output should be your role annotation.
If you don’t want to use Helm to install kube2iam, you can do it manually instead. Here are the steps:
As in the previous section, you’ll need to create roles for your node to assume. Remember that each node in your cluster must have an IAM policy attached.
Next, create roles for the Pods to assume. Each role will require a policy with only the permissions that Pod requires to perform its duty. Don’t forget to add permission to your Kubernetes nodes to assume these roles.
Note that the kube2iam container is being run with the arguments --iptables=true, --host-ip=$(HOST_IP), and in privileged mode as true. These settings stop containers running in other Pods from directly accessing the EC2 metadata API and obtaining unwanted access to AWS resources.
The only drawback with this approach is that you have manually created these resources using kubectl, while the setup is simpler with Helm.
Conclusion
Using kube2iam to restrict access of your Pods to other AWS resources avoids the security issues of wider Pod permissions or of using IAM user keys, which can be accidentally leaked. This tool offers a straightforward way to keep your Kubernetes infrastructure safe in AWS.
Another way to maximize your Kubernetes experience is to use a tool like CloudForecast’s Barometer. Barometer offers cost monitoring and optimization reports to help you manage your costs and keep your workflow at peak efficiency.
Karl Hughes
Karl is a freelance technical writer, speaker, technology team leader and startup founder.
Table of contents
Join our weekly digest and receive some of our best AWS tips & tricks.
Newsletter
Join our weekly digest and receive some of our best posts
Subscribe to our newsletter to get the latest news, updates, and posts.

 This is the workflow of
 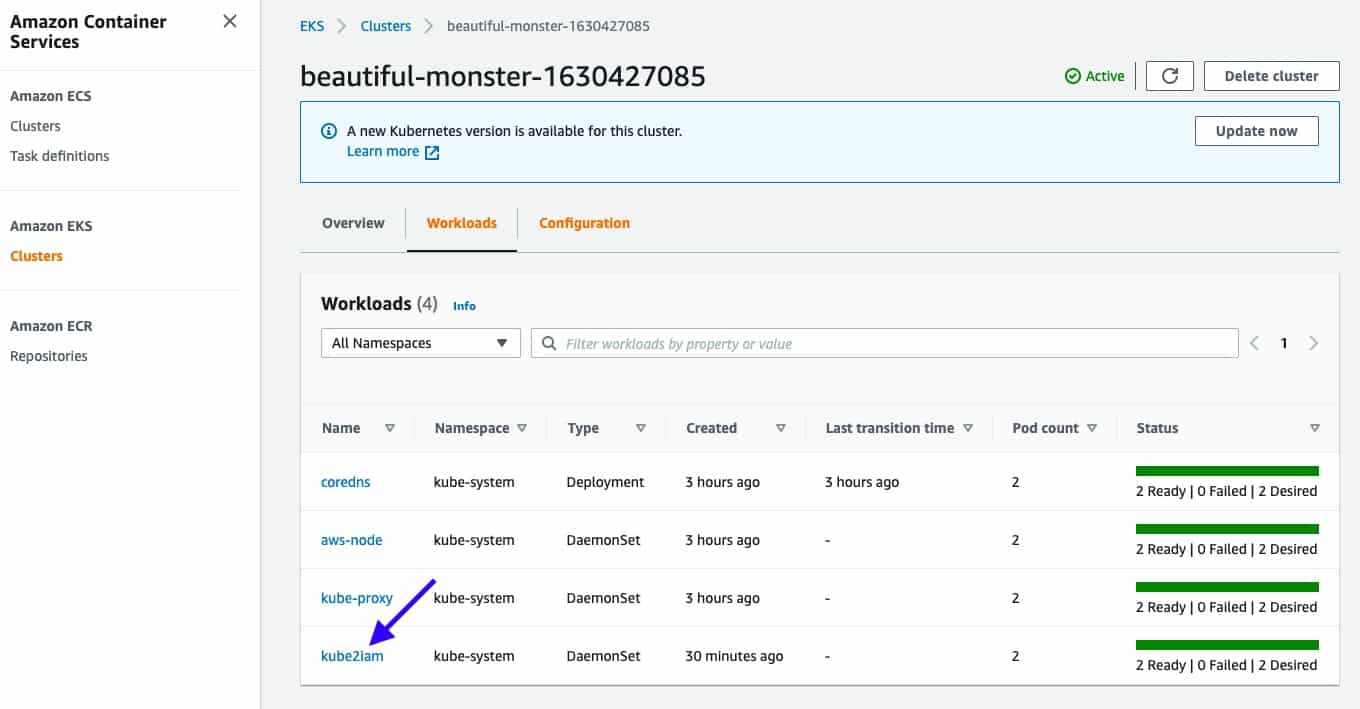 Finally, add an